# Manage filesystems using the GUI
Using the GUI, you can perform the following actions:
* [View filesystems](#view-filesystems)
* [Create a filesystem](#create-a-filesystem)
* [Edit a filesystem](#edit-a-filesystem)
* [Delete a filesystem](#delete-a-filesystem)
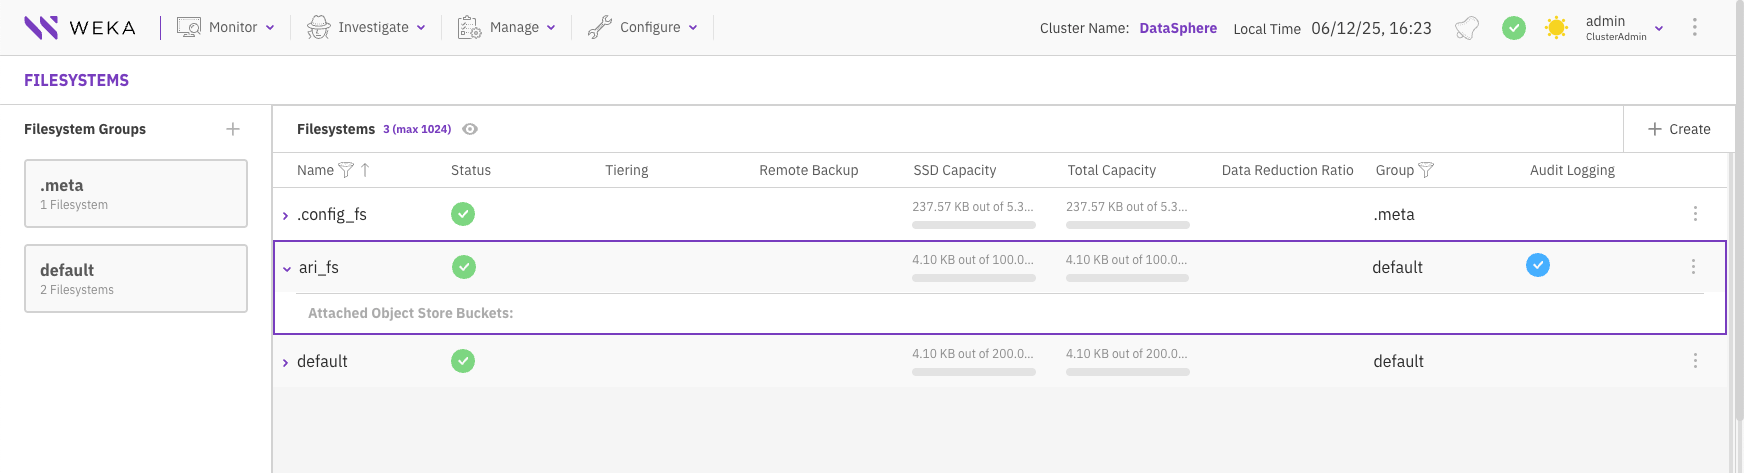
## View filesystems
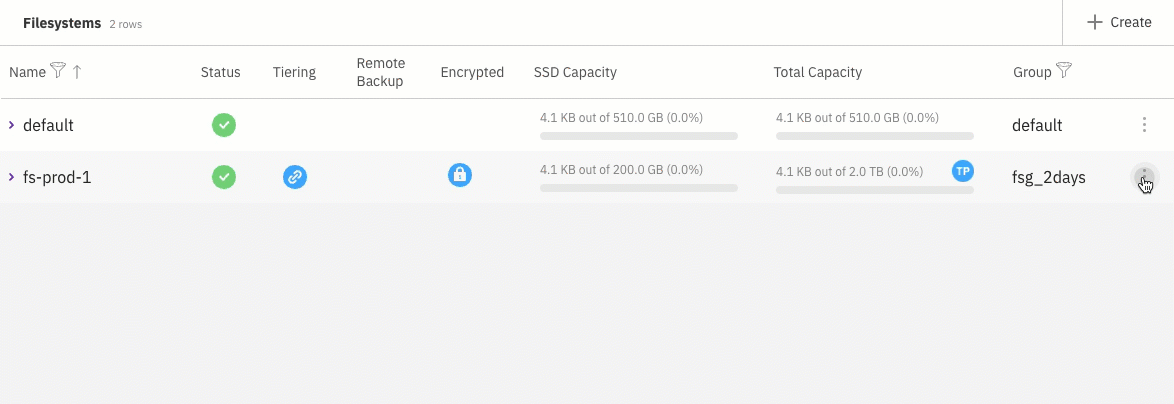
The filesystems are displayed on the **Filesystems** page. Each filesystem indicates the status, tiering, remote backup, encryption, SDD capacity, total capacity, filesystem group, and data reduction details.
**Before you begin**
Ensure a filesystem group is set with the required tiering policy. See [#add-a-filesystem-group](https://docs.weka.io/5.0/managing-filesystem-groups/managing-filesystem-groups#add-a-filesystem-group "mention").
**Procedure**
1. From the menu, select **Manage > Filesystems**.
## Create a filesystem
When deploying a WEKA system on-premises, no filesystem is initially provided. You must create the filesystem and configure its properties, including capacity, group, tiering, thin provisioning, encryption, and required authentication during mounting.
When deploying a WEKA system on a cloud platform (AWS, Azure, or GCP), the WEKA system includes a default filesystem configured to maximum capacity. If your deployment necessitates additional filesystems with varied settings, reduce the provisioned capacity of the default filesystem and create a new filesystem with the desired properties to meet your specific requirements.
**Before you begin**
* Verify that the system has free capacity.
* Verify that a filesystem group is already set.
* If tiering is required, verify that an object store bucket is set.
* If audit logging required, verify that the Audit and Forwarding feature is enabled and configured.
* If encryption is required, verify that a KMS is configured.
**Procedure**
1. From the menu, select **Manage > Filesystems**.
2. Select the **+Create** button.
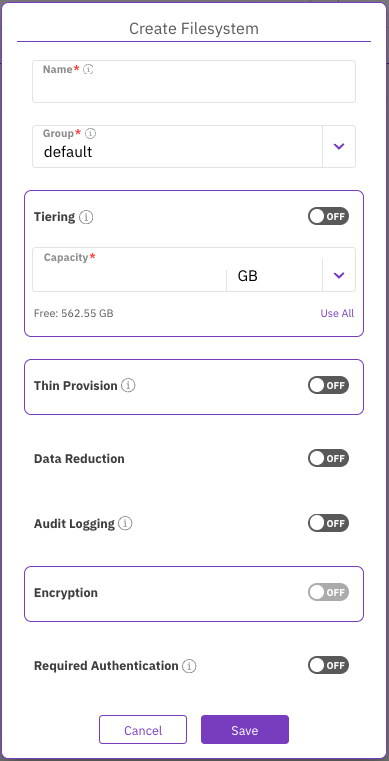
3. In the **Create Filesystem** dialog, set the following:
* **Name**: Enter a descriptive label for the filesystem, limited to 32 characters and excluding slash (`/`) or backslash (`\`).
* **Group**: Select the filesystem group that fits your filesystem.
* **Capacity**: Enter the storage size to provision, or select **Use All** to provision all the free capacity.
Create filesystem
4. Optional: **Tiering**.\
If tiering is required, and the following conditions are met:
* An object store bucket is already defined.
* Data reduction is not enabled.
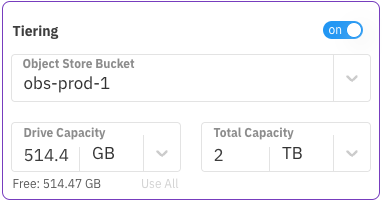
Then, turn on the **Tiering** toggle and specify the following:
* **Object Store Bucket:** Select a predefined object store bucket from the list.
* **Drive Capacity:** Enter the SSD capacity to provision, or select **Use All** to allocate all available free capacity.
* **Total Capacity:** Enter the total capacity of the object store bucket, including the drive capacity.
**Best practice:** Use a 1:4 ratio between the drive capacity and total capacity, as shown in the example below. When tiering is enabled, you can also create the filesystem from an uploaded snapshot. For more information, see the related topics below.
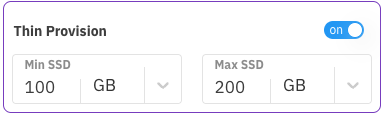
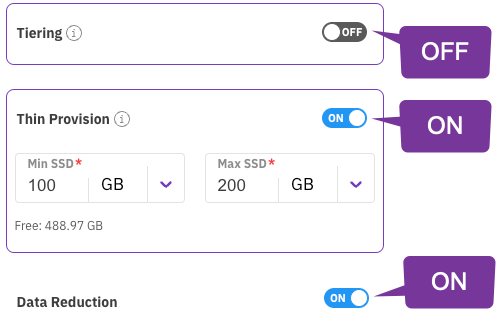
5. Optional: **Thin Provision**.\
If Thin Provision is required, select the toggle button, and set the minimum (guaranteed) and the maximum capacity for the thin provisioned filesystem.\
The minimum capacity must be less or equal to the available SSD capacity.\
You can set any maximum capacity, but the available capacity depends on the actual free space of the SSD capacity.\
Thin provisioning is mandatory when enabling data reduction.
6. Optional: **Data Reduction**.\
Data reduction can be enabled only on thin provision, non-tiered, and unencrypted filesystems on a cluster with a valid data reduction license (you can verify the data reduction license in the cluster settings). For more details, see the related topics below.\
To enable the Data Reduction, turn on the toggle button.
Data reduction
7. Optional: If **Audit Logging** is required for this filesystem, select the toggle button. When on, the WEKA system Forwards this filesystem's audit logs to a configured events monitoring platform, provided that cluster-wide auditing is also enabled.
{% hint style="info" %}
To use the **Audit Logging** option, ensure the **Audit and Forwarding** feature is enabled and configured. For more information, see [audit-and-forwarding-management](https://docs.weka.io/5.0/operation-guide/audit-and-forwarding-management "mention").
{% endhint %}
8. Optional: If **Encryption** is required and your WEKA system is deployed with a KMS, select the toggle button.
9. Optional: **Required Authentication**.\
When ON, user authentication is required when mounting to the filesystem. This option is only relevant to a filesystem created in the root organization.\
Enabling authentication is not allowed for a filesystem hosting NFS client permissions or SMB shares.\
To authenticate during mount, the user must run the `weka user login` command or use the `auth_token_path` parameter.
10. Select **Save**.
**Related topics**
[managing-filesystem-groups](https://docs.weka.io/5.0/weka-filesystems-and-object-stores/managing-filesystem-groups "mention")
[managing-object-stores](https://docs.weka.io/5.0/weka-filesystems-and-object-stores/managing-object-stores "mention")
[kms-management](https://docs.weka.io/5.0/security/kms-management "mention")
[overview](https://docs.weka.io/5.0/licensing/overview "mention")
[tiering](https://docs.weka.io/5.0/weka-filesystems-and-object-stores/tiering "mention")
[#data-reduction-in-weka-filesystems](https://docs.weka.io/5.0/weka-system-overview/filesystems#data-reduction-in-weka-filesystems "mention")
[#create-a-filesystem-from-an-uploaded-snapshot](https://docs.weka.io/5.0/snap-to-obj/snap-to-obj#create-a-filesystem-from-an-uploaded-snapshot "mention")
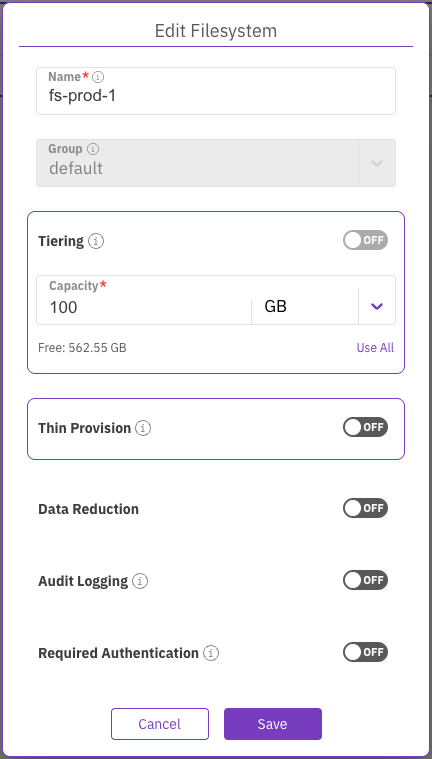
## Edit a filesystem
You can modify the filesystem parameters according to your demand changes over time. The parameters you can modify include filesystem name, capacity, tiering, thin provisioning, and required authentication (but not encryption).
**Procedure**
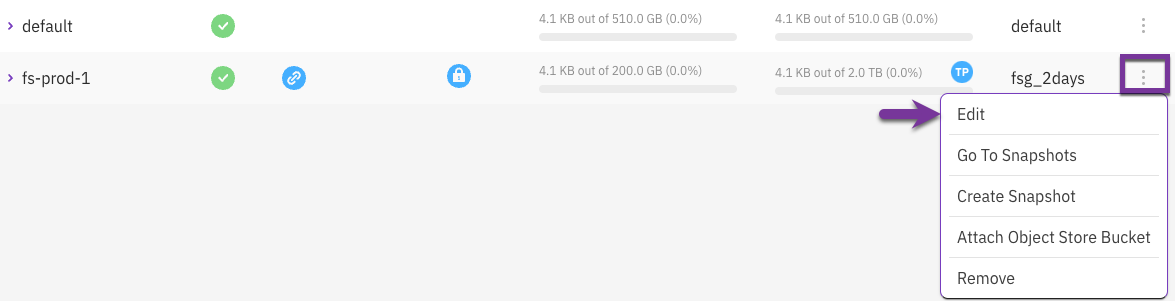
1. From the menu, select **Manage > Filesystems**.
2. Select the three dots on the right of the filesystem you want to modify, and select **Edit**.
3. In the **Edit Filesystem** dialog, modify the parameters according to your requirements. (See the parameter descriptions in the [Add a filesystem](#add-a-filesystem) topic.)
Edit a filesystem
4. Select **Save**.
## Delete a filesystem
You can delete a filesystem if its data is no longer required. Deleting a filesystem does not delete the data in the tiered object store bucket.
{% hint style="info" %}
If you must also delete the data in the tiered object store bucket, see the [Delete a filesystem](https://docs.weka.io/5.0/weka-filesystems-and-object-stores/managing-filesystems-1#delete-a-filesystem) topic in the CLI section.
{% endhint %}
**Procedure**
1. From the menu, select **Manage > Filesystems**.
2. Select the three dots on the right of the filesystem you want to delete, and select **Remove**.
3. To confirm the filesystem deletion, enter the filesystem name and select **Confirm**.