Upgrade WEKA versions
Upgrade your WEKA system with the latest version.
Upgrade overview
The WEKA upgrade process supports upgrades of a WEKA system using a non-disruptive upgrade (NDU).
When considering an upgrade, adhere to the following guidelines:
To upgrade to 4.3.Y, the minimum source version allowed is 4.2.1.
The upgrade must always be from an older version to a newer one. For instance, an upgrade from 4.2.X to 4.3.Y is permissible only if 4.3.Y was released after 4.2.X.
Stay within the same major version or upgrade from an older major version to its successor.
There might be exceptions, so always check the minimum and maximum versions supported for the upgrade. For information on the release dates and applicable versions for the upgrade, visit get.weka.io.
For example, upgrading from version 4.2.10 (released on April 12, 2024) to version 4.3.0 (released on April 23, 2024) is allowed. However, future LTS releases do not permit upgrading to version 4.3.0. In the following example, even though version 4.3.1 (released on May 20, 2024) is older than version 4.2.11 (released on May 10, 2024), the maximum version allowed for the upgrade is 4.2.10 or 4.3.0.

The source system must be set up in MCB architecture. If not, contact the Customer Success Team to convert the cluster architecture to MCB. See Convert cluster to multi-container backend. This workflow is only intended for professional services.
Customers running WEKA clusters on AWS with auto-scaling groups must contact the Customer Success Team before converting the cluster to MCB.
What is a non-disruptive upgrade (NDU)
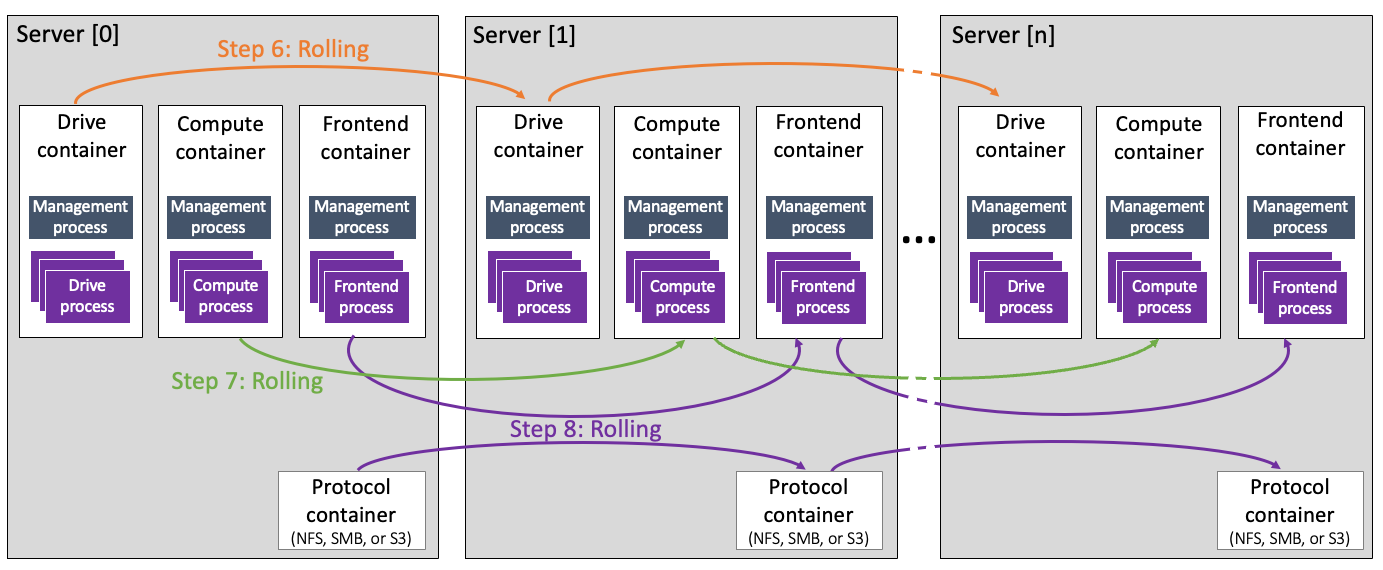
In MCB architecture, each container serves a single type of process, drive, frontend, or compute function. Therefore, upgrading one container at a time (rolling upgrade) is possible while the remaining containers continue serving the clients.
Some background tasks, such as snapshot uploads or downloads, must be postponed or aborted. See the prerequisites in the upgrade workflow for details.
Internal upgrade process
Once you run the upgrade command in ndu mode, the following occurs:
Downloading the version and preparing all backend servers.
Rolling upgrade of the drive containers.
Rolling upgrade of the compute containers.
Rolling upgrade of the frontend and protocol containers and the protocol gateways.

Related topics
WEKA containers architecture overview
Upgrade workflow
Adhere to the following considerations:
Protocol separation: Upgrading a WEKA cluster with a server used for more than one of the following protocols, NFS, SMB, or S3, is not permitted. If such a case arises, the upgrade process does not initiate and indicates the servers that require protocol separation. Contact the Customer Success Team to ensure only one additional protocol is installed on each server.
Legacy NFS protocol: If a legacy NFS protocol is implemented, contact the Customer Success Team. In this case, the upgrade is blocked.
NFS file-locking prerequisite before upgrade: Ensure the
rpc.statdandrpc-statd-notifiyservices are stopped on the WEKA servers. If not, run the following commands:systemctl disable rpc-statd.servicesystemctl disable srpc-statd-notify-serviceS3 Cluster Creation: If you plan to create an S3 cluster, it’s crucial to ensure the upgrade process is complete and all containers are up before initiating the creation.
1. Verify system upgrade prerequisites
Ensure the environment meets the necessary prerequisites before proceeding with any system upgrade. The WEKA Upgrade Checker Tool automates these essential checks, comprehensively assessing the system’s readiness. Whether performing a single-version upgrade or a multi-hop upgrade, following this procedure is mandatory.
Summary of the WEKA Upgrade Checker Tool results:
Passed checks (Green): The system meets all prerequisites for the upgrade.
Warnings (Yellow): Address promptly to resolve potential issues.
Failures (Red): Do not proceed; they may lead to data loss.
Multi-hop version upgrades:
After completing an upgrade, a background process initiates the conversion of metadata to a new format (in specific versions). This conversion may take several minutes before another upgrade can commence. To monitor the progress, use the weka status CLI command and check if a data upgrade task is RUNNING.
By diligently following this system readiness validation procedure, you can confidently proceed with system upgrades, minimizing risks and ensuring a smooth upgrade.
Prioritize running the WEKA Upgrade Checker 24 hours before any scheduled upgrades. This step is critical to identify and address any potential issues proactively.
Ensure passwordless SSH access is set up on all backend servers. This is crucial for the seamless execution of the Python script while running the WEKA Upgrade Checker.
Procedure
Log in to one of the backend servers as a root user:
Access the server using the appropriate credentials.
Obtain the WEKA Upgrade Checker: Choose one of the following methods:
Method A: Direct download
Clone the WEKA Upgrade Checker GIT repository with the command:
git clone https://github.com/weka/tools.git
Method B: Update from existing tools repository
If you have previously downloaded the tools repository, navigate to the tools directory.
Run
git pullto update the tools repository with the latest enhancements. (The WEKA tools, including the WEKA Upgrade Checker, continuously evolve.)
Run the WEKA Upgrade Checker: Navigate to the weka_upgrade_checker directory. It includes a binary version and a Python script of the tool. A minimum of Python 3.8 is required if you run the Python script.
Run the Python script:
python3.8 ./weka_upgrade_checker.py --target-version <version>Or
Run the Python precompiled script:
./weka_upgrade_checker --target-version <version>
Replace
<version>with your target version. For example4.4.4.The tool scans the backend servers and verifies the upgrade prerequisites.
Review the results:
Pay attention to the following indicators:
Green: Passed checks. Ensure the tool's version is the latest.
Yellow: Warnings that require attention and remedy.
Red: Failed checks. If any exist, do not proceed. Contact the Customer Success Team.
Send the log file to the Customer Success Team:
The
weka_upgrade_checker.logis located in the same directory where you ran the tool. Share the latest log file with the Customer Success Team for further analysis.
2. Prepare the cluster for upgrade
Download the new WEKA version to one of the backend servers using one of the following methods depending on the cluster deployment:
Method A: Using a distribution server
Method B: Direct download and install from get.weka.io
Method C: If the connectivity to get.weka.io is limited
For details, select the relevant tab.
Use this method if the cluster environment includes a distribution server from which the target WEKA version can be downloaded.
If the distribution server contains the target WEKA version, run the following commands from the cluster backend server:
Where: <version> is the target WEKA version, for example: 4.3.0.
If the distribution server does not contain the target WEKA version, add the option --from to the command, and specify the get.weka.io distribution site, along with the token.
Example:
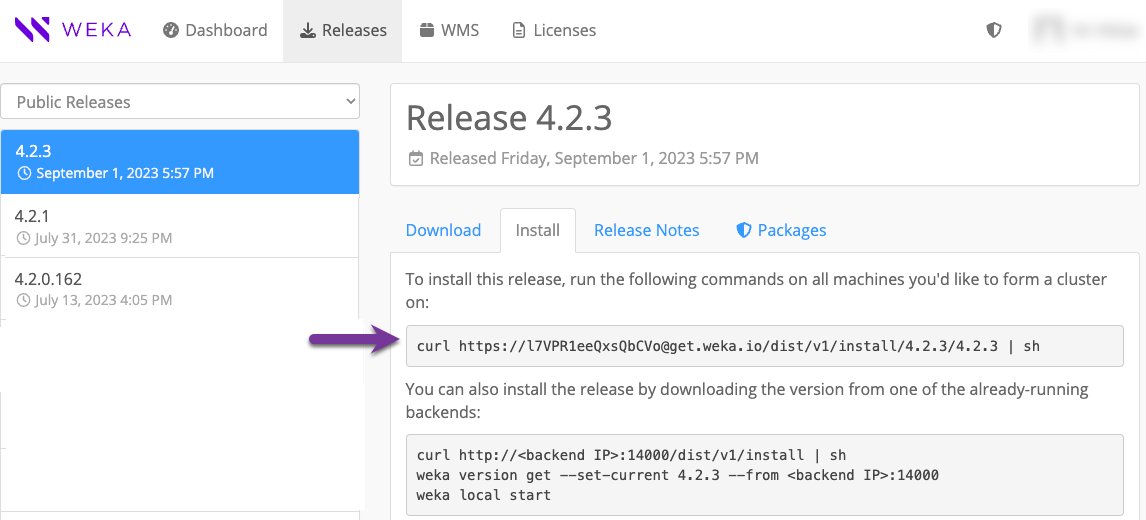
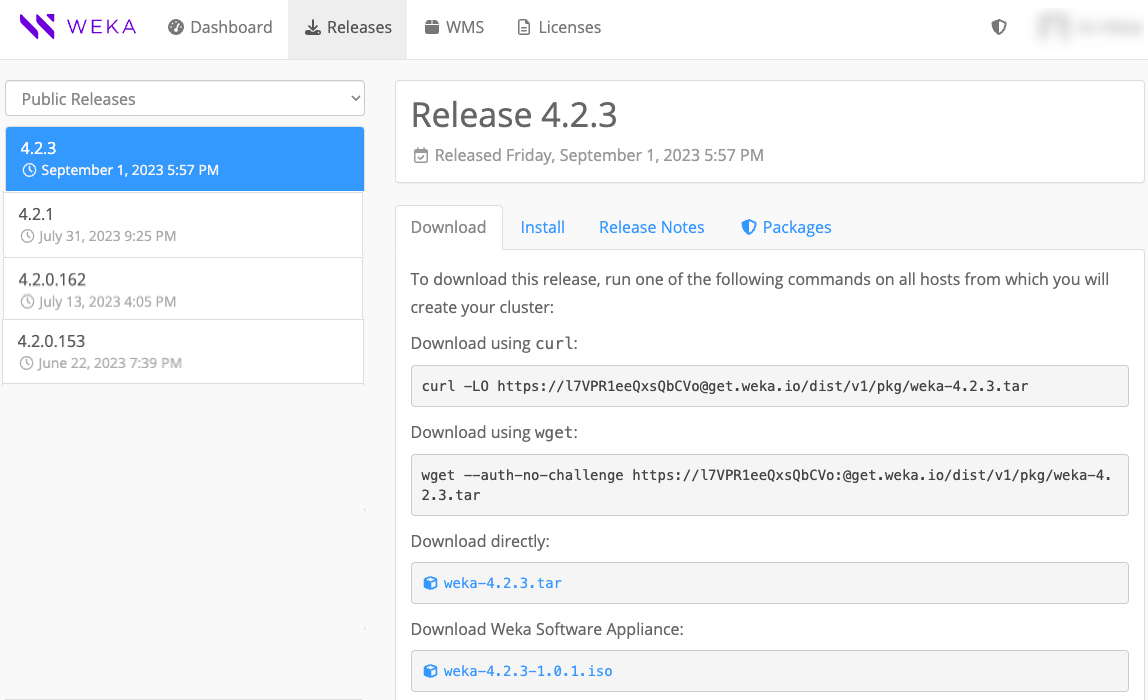
Use this method if the cluster environment has connectivity to get.weka.io.
From the Public Releases on the get.weka.io, select the required release.
Select the Install tab.
From the backend server, run the
curlcommand line as shown in the following example.

Use this method if the cluster environment does not have connectivity to get.weka.io, such as with private networks or dark sites.
Download the new version tar file to a location from which you copy it to a dedicated directory in the cluster backend server, and untar the file.
From the dedicated directory in the cluster backend server, run the
install.shcommand.

3. Prepare the backend servers for upgrade (optional)
When working with many backend servers, preparing them separately from the upgrade process in advance is possible to minimize the total upgrade time. For a small number of backend servers, this step is not required.
The preparation phase prepares all the connected backend servers for the upgrade, which includes downloading the new version and getting it ready to be applied.
Once the new version is downloaded to one of the backend servers, run the following CLI command:
weka local run --container drives0 --in <new-version> upgrade --prepare-only
Where:
<new-version>: Specify the new version. For example,4.3.4.
4. Upgrade the backend servers
Once a new software version is installed on one of the backend servers, upgrade the entire cluster backend servers to the new version by running the following command on the backend server.
If you already ran the preparation step, the upgrade command skips the download and preparation operations.
weka local run --container drives0 --in <new-version> upgrade
Consider the following guidelines:
Before switching the cluster to the new software release, the upgrade command distributes the new release to all cluster servers. It makes the necessary preparations, such as compiling the new
wekafsdriver.If a failure occurs during the preparation, such as a disconnection of a server or failure to build a driver, the upgrade process stops, and a summary message indicates the problematic server.
If cleanup issues occur during a specific upgrade phase, rerun it with the relevant option:
If the container running the upgrade process uses a port other than the default (14000), include the option
--mgmt-port <existing-port>to the command.
5. Upgrade the clients
Once all backends are upgraded, the clients remain with the existing version and continue working with the upgraded backends. The client's version can only be one major version behind the version of the backends. Therefore, clients must be upgraded before the next cluster software version upgrade. The minimum source version for client upgrades is 4.2.X.
Stateless client upgrade options
If a stateless client is mounted on a single cluster, it is automatically upgraded to the backend version after rebooting, or a complete
umountandmountis performed.If a stateless client is mounted on multiple clusters, the client container version is the same as the
client-target-versionin the cluster (see Mount filesystems from multiple clusters on a single client).Stateless clients can also be upgraded manually.
Use the
--client-onlyflag in theweka version getcommand to ensure that only the essential components relevant to the stateless client operation are downloaded, excluding non-relevant packages.To limit the display of versions unless the complete set of components is present, use the
--fullflag with theweka versioncommand This provides you with finer control over version information visibility.You can manually upgrade the clients locally (one by one) or remotely (in batches), usually during a maintenance window.
Persistent client upgrade options
Clients can be upgraded manually. This can be done either locally on each client individually or remotely in batches. This process typically occurs during a scheduled maintenance window.
An upgrade is performed on a gateway, which is a persistent client that runs a specific protocol. This gateway is associated with containers with the
allow_protocolsparameter set to true. The upgrade process involves interaction with backend servers.
Client upgrade procedures
To upgrade a stateless or persistent client locally, connect to the client and run the following command line:
Run:
weka version get <target-version> --from <backend name or IP>:<port>Upgrade the agent by running the following (replace the x with the latest minor version):
weka version set --agent-only 4.3.xUpgrade the client containers. Do one the following following:
For clients connected to a single cluster, run
weka local upgradeFor clients connected to a multiple clusters, upgrade all containers simultaneously by running
weka local upgrade --all
An alert is raised if there is a mismatch between the clients' and the cluster versions.
Add the --from <backend name or IP> option to download the client package only from the backend, thus avoiding downloading from get.weka.io. The default port is 14000.
To upgrade stateless or persistent clients remotely in batches, add the following options to the weka local upgrade command:
--mode=clients-upgrade: This option activates the remote upgrade.--client-rolling-batch-size: This option determines the number of clients to upgrade in each batch. For example, if there are 100 clients, you can set this option to 10 and the upgrade will run 10 batches of 10 clients each.
If you need upgrade specific clients, add the --clients-to-upgrade and the clients' ids to upgrade. For example, --clients-to-upgrade 33,34,34.
If you need to skip upgrade of specific clients, add the --drop-host and the clients' ids to skip. For example, --drop-host 22,23.
If an upgrade of a client part of a batch fails, it stops the following batch upgrade. The current running batch continues the upgrade.
Command syntax
weka local run -C <backend name> --in <target release> upgrade --mode=clients-upgrade --client-rolling-batch-size <number of clients in a batch> --clients-to-upgrade <comma separated clients' ids> --drop-host <comma separated clients' ids> --from backends
Example
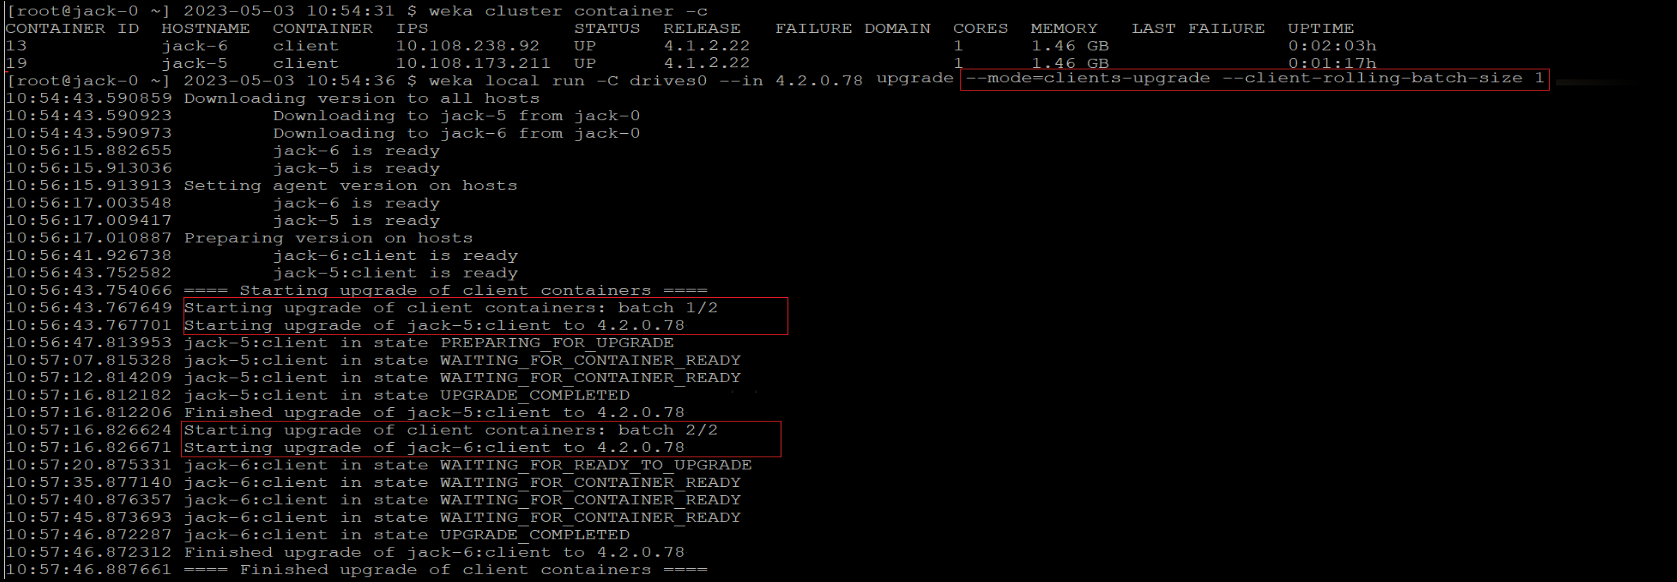
The following command line upgrade two clients in two batches (each batch has one client):
weka local run -C drives0 --in 4.2.0.78 upgrade --mode=clients-upgrade --client-rolling-batch-size 1
Output example:

6. Check the status after the upgrade
Once the upgrade is complete, verify that the cluster is in the new version by running the weka status command.
Example: The following is returned when the system is upgraded to version 4.3.0:
# weka status
Weka v4.3.0
...
Last updated