Manage users using the GUI

Explore the management of users licensed to work with the WEKA system using the GUI.

Using the GUI, you can:

Manage local users

Local users are created in the local system instead of domain users that the organization's User Directory manages. You can create up to 1152 local users to work with a WEKA system cluster.

Create a local user

Procedure

  1. From the menu, select Configure > User Management.

  2. In the Local Users tab, select +Create.

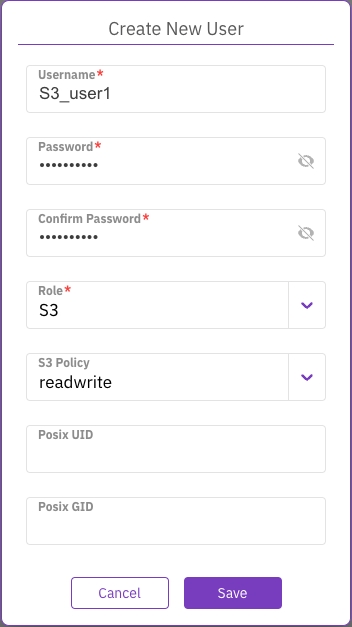
  3. In the Create New User dialog, set the following properties:

    • Username: Set the user name for the local user.

    • Password: Set a password according to the requirements. The password must contain at least 8 characters: an uppercase letter, a lowercase letter, and a number or a special character.

    • Confirm Password: Type the same password again.

    • Role: Select the role for the local user. If you select an S3 user role, select the relevant S3 policy and, optionally, the and .

  4. Select Save.

Edit a local user

You can modify the role of a local user but not your role (the signed-in user). For an S3 user, you can only modify the S3 policy, POSIX UID, and POSIX GID.

Procedure

  1. In the Local Users tab, select the three dots of the local user you want to edit, then select Edit User.

  2. From the Role property, select the required role. If you modify the role to S3, you can set the S3 policy, POSIX UID, and POSIX GID.

  3. Select Save.

Change a local user password

As a Cluster Admin or Organization Admin, you can change the password of a local user and revoke the user's tokens.

To regain access to the system after changing the password, the user must re-authenticate using the new password.

Procedure

  1. In the Local Users tab, select the three dots of the local user whose password you want to change, then select Change Password.

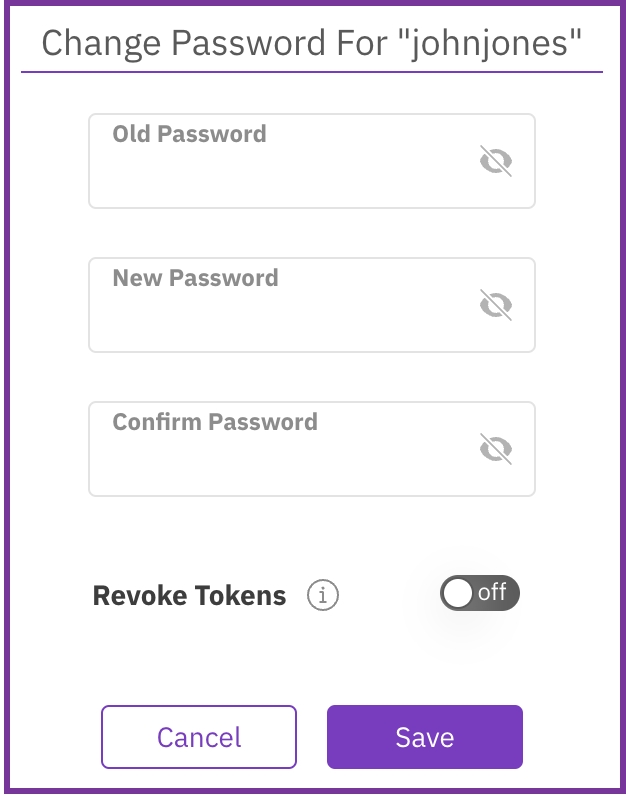
  2. In the Change Password for a user dialog, set the following properties:

    • Old password: Set the old password.

    • Password: Set a new password according to the requirements.

    • Confirm Password: Type the same new password again.

    • Revoke Tokens: If the user's existing tokens are compromised, you can revoke all of the user's tokens and change their password. To regain access to the system, the user must re-authenticate with the new password or obtain new tokens through the API.

  3. Select Save.

Change your password

You can change your password at any time.

Procedure

  1. From the top bar, select the signed-in user, then select Change Password.

  1. In the Change Password dialog, set the properties described in the Change a local user password topic.

  2. Select Save.

Revoke local user tokens

If the user's existing tokens are compromised, you can revoke all the user's tokens, regardless of changing the user's password. To re-access the system, the user re-authenticates with the new password, or the user needs to obtain new tokens using the API.

Procedure

  1. In the Local Users tab, select the three dots of the local user you want to revoke the user tokens, then select Revoke User Tokens.

  1. In the confirmation message, select Revoke Tokens.

Remove a local user

You can remove a local user that is no longer required.

Procedure

  1. In the Local Users tab, select the three dots of the local user to remove, then select Remove User.

In the confirmation message, select Yes.

Manage user directory

You can set user access to the Weka system from the organization user directory, either by LDAP or Active Directory.

Configure LDAP

To use LDAP for authenticating users, set the property values based on your specific LDAP environment and configuration.

LDAP property descriptions
  • Server URI: The URI or address of the LDAP server, including the protocol (in this case, LDAP), the server's hostname or IP address, and the port number. Example value: ldap://ldap.example.com:389

  • Protocol Version: The version of the LDAP protocol being used. Common versions include LDAPv2 and LDAPv3. Example value: 3

  • Start TLS: When enabled, this option initiates a Transport Layer Security (TLS) connection with the LDAP server. TLS provides encryption and secure communication between the client and server, protecting the confidentiality and integrity of data transmitted over the network.

  • Ignore Certificate Failures: When enabled, this option instructs the LDAP client to ignore certificate validation failures during the TLS/SSL handshake process. Certificate validation failures can include expired, self-signed, or mismatched certificates. Enabling this option allows the client to establish a connection even if the server's certificate cannot be fully validated. Use this option cautiously, as it may expose the connection to potential security risks.

    Enabling Start TLS and Ignore Certificate Failures must be done based on your specific security requirements and the configuration of your LDAP server.

  • Server Timeout Seconds: The maximum amount of time, in seconds, the client waits for a response from the LDAP server before timing out. Example value: 30

  • Base DN : The base distinguished name (DN) is the starting point for searching the directory tree. It represents the top-level entry in the LDAP directory. Example Value: dc=example,dc=com

  • Reader Username: The username or distinguished name (DN) of a dedicated reader user account used for authenticating and reading data from the LDAP server. Example value: cn=reader,dc=example,dc=com

  • Reader Password: The password is associated with the reader user account for authentication purposes. Example Value: ********

  • User ID Attribute: The attribute in the LDAP schema that represents the unique identifier or username for user entries. Example value: uid

  • User Object Class: The object class or object type in the LDAP schema defines the structure and attributes of user entries. Example value: person

  • User Revocation Attribute: An attribute indicates a user account's revocation status, typically a boolean attribute set to true or false. Example value: isRevoked

  • Group ID Attribute: The attribute in the LDAP schema represents the unique identifier or name for group entries. Example value: cn

  • Group Membership Attribute: The attribute establishes the membership relationship between users and groups, specifying which users are members of a particular group. Example value: member

  • Group Object Class: The object class or object type in the LDAP schema defines the structure and attributes of group entries. Example value: groupOfNames

  • Cluster Admin Group: The LDAP group granted administrative privileges for managing the LDAP cluster. Example value: cn=cluster_admins,ou=groups,dc=example,dc=com sAMAccountName: cluster_admins

  • Organization Admin Role Group: The LDAP group granted administrative privileges for managing specific organizations or units within the LDAP directory. Example value: cn=org_admins,ou=groups,dc=example,dc=com sAMAccountName: org_admins

  • Regular User Role Group: The group in LDAP represents regular users with standard access privileges. Example value: cn=regular_users,ou=groups,dc=example,dc=com sAMAccountName: regular_users

  • Read-only User Role Group: The group in LDAP represents users with read-only access privileges restricted from making modifications. Example value: cn=read_only_users,ou=groups,dc=example,dc=com sAMAccountName: read_only_users

Note: The sAMAccountName (user logon name) in the Cluster Admin, Organization Admin, Regular User, and Read-only User Role Groups can be up to 20 characters long.

Procedure

  1. From the menu, select Configure > User Management.

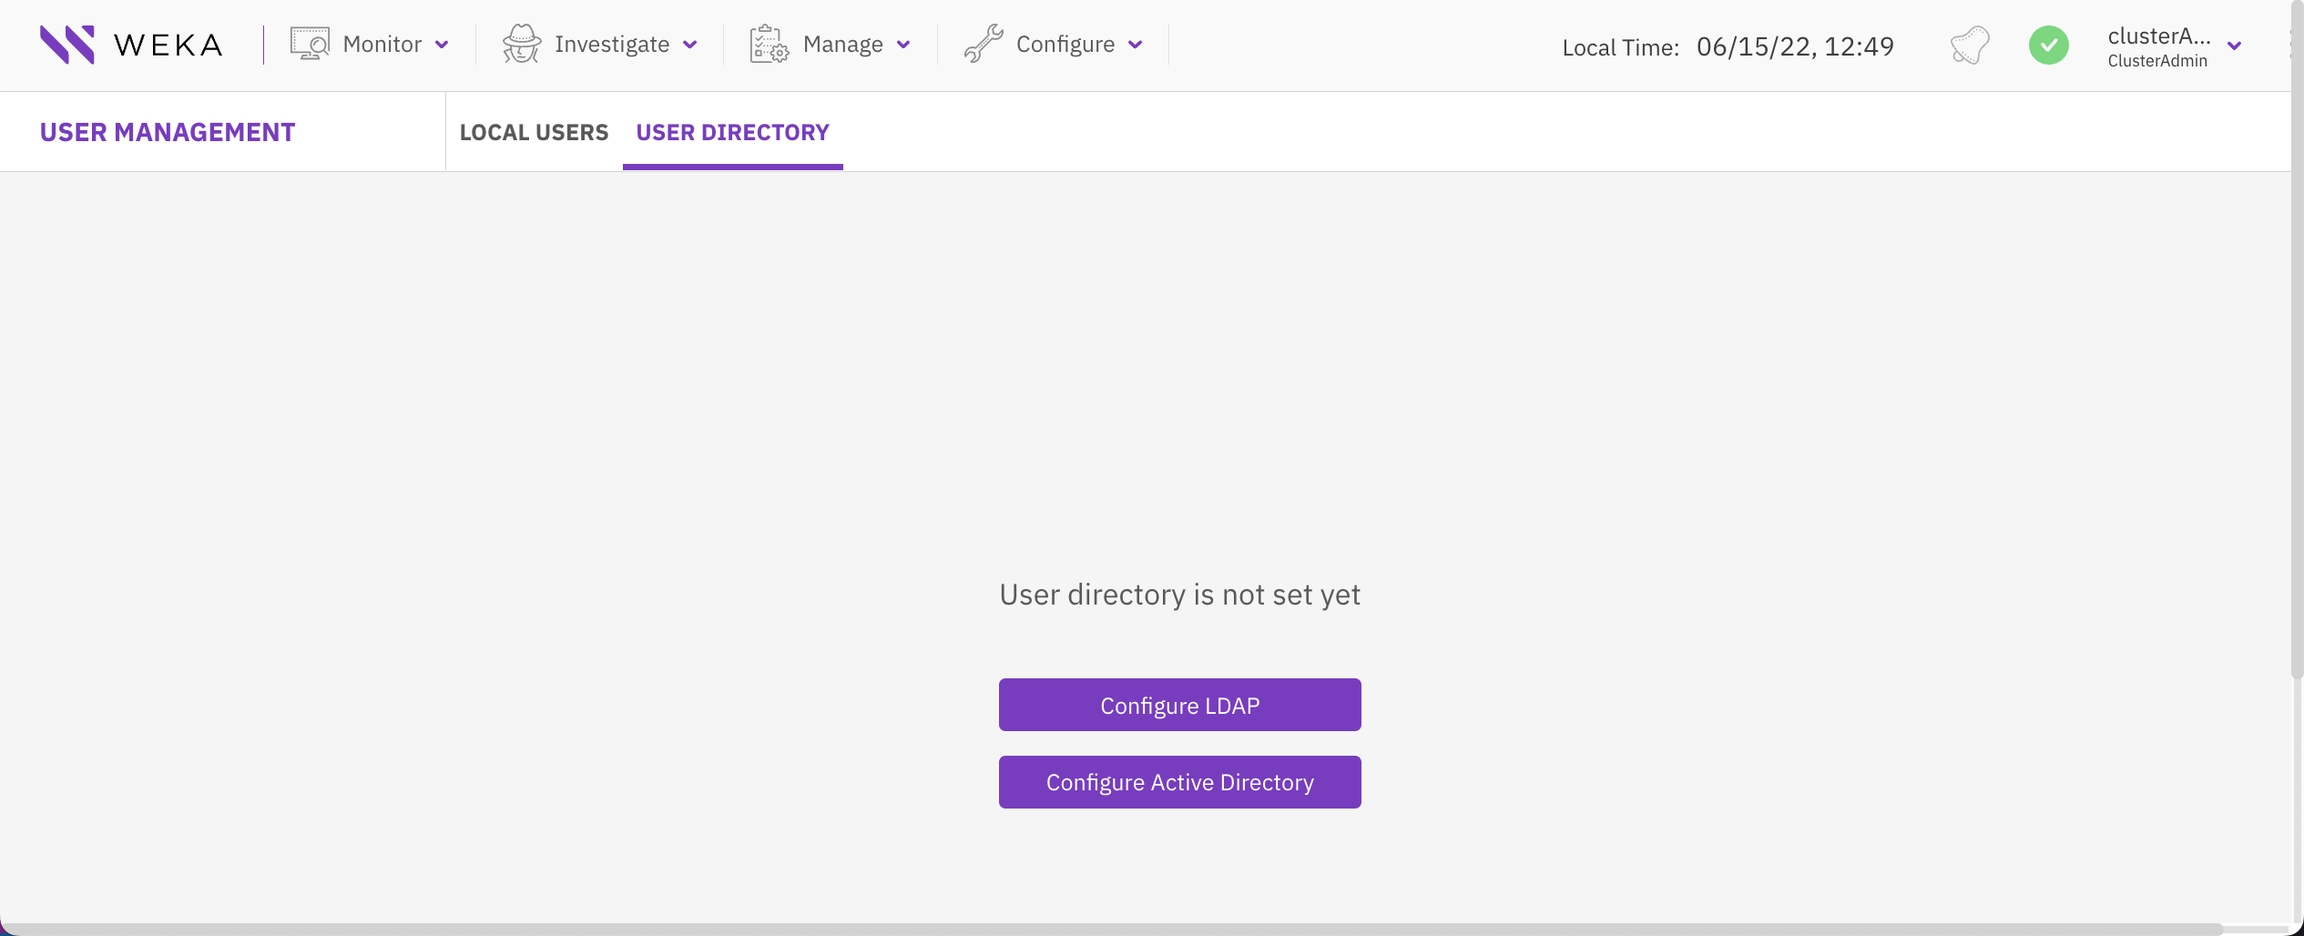
  2. Select the User Directory tab.

  3. Select Configure LDAP.

  4. Set all properties based on your specific LDAP environment and configuration.

  5. Select Save.

Once the LDAP configuration is completed, the User Directory tab displays the details. You can disable the LDAP configuration, update the configuration, or reset the configuration values.

Configure Active Directory

To use Active Directory for authenticating users, set the property values based on your specific Active Directory environment and configuration.

Active Directory property descriptions
  • Domain: The domain name of the Active Directory environment. It represents the network boundary and provides a way to organize and manage resources, users, and groups. Example value: example.com

  • Server URI: The URI or address of the Active Directory server, including the protocol (in this case, LDAP) and the server's hostname or IP address. Example value: ldap://ad.example.com

  • Reader Username: A dedicated reader user account's username or user principal name (UPN) used for authenticating and reading data from the Active Directory. Example value: readeruser@ad.example.com

  • Reader Password: The password associated with the reader user account for authentication purposes. Example Value: ********

  • Cluster Admin Role Group: The group in Active Directory granted administrative privileges for managing the cluster or server infrastructure. Example value: CN=ClusterAdmins,CN=Users,DC=example,DC=com sAMAccountName: ClusterAdmins

  • Organization Admin Role Group: The group in Active Directory granted administrative privileges for managing specific organizations or units within the Active Directory environment. Example value: CN=OrgAdmins,CN=Users,DC=example,DC=com sAMAccountName: OrgAdmins

  • Regular User Role Group: The group in Active Directory represents regular users with standard access privileges. Example value: CN=RegularUsers,CN=Users,DC=example,DC=com sAMAccountName: RegularUsers

  • Read-only User Role Group: The group in Active Directory represents users with read-only access privileges, restricted from making modifications. Example value: CN=ReadOnlyUsers,CN=Users,DC=example,DC=com sAMAccountName: ReadOnlyUsers

Note: The sAMAccountName (user logon name) in the Cluster Admin, Organization Admin, Regular User, and Read-only User Role Groups can be up to 20 characters long.

Procedure

  1. From the menu, select Configure > User Management.

  2. Select the User Directory tab.

  3. Select Configure Active Directory.

  4. Set all properties based on your specific Active Directory environment and configuration.

  5. Select Save.

Once the Active Directory configuration is completed, the User Directory tab displays the details. You can disable the Active Directory configuration, update the configuration, or reset the configuration values.

Last updated